Products


Your Cart

Shopping cart  Shopping cart
0 Product(s) in cart
Total $0.00
» Checkout
 

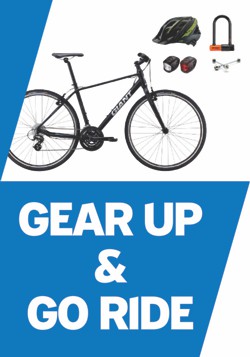
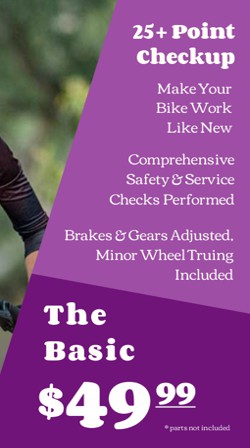
Things You Should Do to Your Bike Every Week


Other Than Ride it as Much as Possible

Why This is Important to Do?

Taking the time once a week to check over some key things on your bike will help you maintain your bike so that it will last longer, keep you aware of future repairs, and possibly alert you to anything that may be a safety hazard.  Here are some of the things you should check regularly.

Check Your Chain

Checking the chain on you bike to make sure that it is properly lubricated is similar to checking the oil in your car.  You should check it frequently, add oil when necessary, and recognize when it is time for your current oil to be changed.
    Once a week feel your chain and see if any residue comes off on your fingers.  If there is no oil on your fingers, then it is time to add some lubrication to your chain.  If you feel your chain and the residue is sticky like roofing tar and/or it is gritty, then it is time to clean off your chain and apply fresh lubrication.  Keeping your chain lubricated and clean will reduce friction and keep your drive train parts (chain, rear cogs, and front chain rings) from wearing out too quickly. Click on "Lubrication of Your Bicycle Chain"  and to “What's in a Lube ?" for more information about chain lubrication.

Check the Brakes

Due to nature of their design, the brakes on your bicycle will loose stopping power over a period of time from the brake cables stretching and the brake pad rubber wearing away.  This process is gradual and can go unnoticed until you really need your brakes to stop you.

Start checking your brakes by squeezing the brake lever until the brake pads come into contact with the rim on your wheels.  The lever should have moved no more than half the distance that the lever can travel (before bottoming out on the handle bar) when the pads hit the rim.

If you have squeezed the lever more than half of its full distance of travel and the pads have not hit the rim, then your cable needs to be tightened or your brake pads need to be replaced.

Check your brake pads to see if they need to be replaced by opening up the brakes and looking at the wear line on the side of the pads.  Some pads have three channels in them for this purpose.  If you don't see a wear line or any channels, then it is only a matter of time before the pads wear down to metal causing real problems for rim wear and stopping power.  If this is so, the pads should be replaced.

If the pads are not worn down past their limit remove any metal flakes or dirt that may have gotten stuck in the rubber, connect the brakes back up, make sure the pads hit your rims properly (making no contact with the tire side walls), and tighten the cable by turning the adjuster on the brake or the brake lever.  If the adjuster is out too far for proper adjustment, then tighten the adjuster in all the way, loosen the fixing bolt on the brake, pull the cable tight to the point of adjustment and re-tighten the anchor bolt.

If you are not sure about your brakes or you have any questions concerning brake adjustment, contact Cycle Path and we will be glad to help you.

Check Your Tires

Proper tire inflation is necessary to reduce rolling resistance, keep your rims from getting dented, and reducing the chances of a flat.  The air in your tires will leak slowly over a period of time through microscopic holes in the rubber.  Temperature changes can also cause the pressure to fluctuate. This makes it necessary to check your tire pressure at least once a week.  When you are in a hurry just feeling the tires to see if they are firm is better than not checking them at all, but the best way to check your tires is with a gauge by itself or on a pump. (Don't use the pump at the gas station. These pumps fill up bicycle tires much too quickly and can cause the tire to explode.)  The proper pressure for your tires is lettered on the side wall.  Often there is a range for this pressure.  Higher pressure gives less rolling resistance and less comfort.  Lower pressure gives more comfort and more rolling resistance.

Also spin your tires to see if they are evenly round.  If there is a bulge, then your tire may not be seated properly on the rim or the tire casing may be breaking down.  If the tire is seated improperly (sitting lower or higher on the rim in one place than every where else), let the air out and fill the tire to 20 psi and reposition the tire properly before filling it up to full pressure.  If the threads of the tire are breaking apart causing a bulge then it is time for a new tire (you can sometimes fix smaller cuts or rips in your side walls with rubber cement or by reinforcing the tire with a boot (a small piece of an old tire) on the inside of the tire casing.

Also inspect your tread for wear (threads will show when low). Replacing a tire that has a worn tread before it goes flat will save you from having to replace an inner tube as well.  Removing any small glass or cinders will help stop flats from happening because of these pieces working their way through the tire into the inner tube.

Check Your Bearings

If you locate and fix the play or tightness in the bearing surfaces on your bike you will reduce your chances of having to replace parts due to worn, pitted, or chewed up bearing surfaces.

It is easy to check your bearings for play.  Start by pushing and pulling on a crank arm perpendicularly to the plane of the main triangle of you bike frame. Check your pedals by pulling up and down on them. Check your wheels by wiggling the rims between your bare pads. And check your headset by applying the front brake and pushing your bike back and forth.

To check your headset bearings for tightness lift your bike off the ground and tilt the front wheel down. If the bearings are tight the bars will feel rough, pitted or indexed when you turn your bars side to side from this position.  Check your crank set by removing your chain to the inside of the smallest chain ring and spinning the crank.  The crank set should spin freely and just before it come to rest, it should not rock back and forth (this indicates a pitted bearing surface that is too tight).  Wheels can be checked in a similar manner by spinning them and looking for free movement and the lack of rocking back and forth as it comes to rest unless this is being caused by the weight of a reflector or a valve stem. You can check your pedals by rolling them and feeling that they turn smoothly.

If you find play or tightness in any of your bearing surfaces, then it is time to adjust that part or it may be time to overhaul the errant bearing surface if the bike has been in a lot of rain and mud or the part is older than a year.

Clean Your Bike

Cleaning your bike is not really necessary to make it function properly.  But if you inspect, as you clean, for things such as cracks in the welds of your frame, cables for frayed strands, rims for cracks in the side walls, loose nuts and bolts (on your bike--- not yourself), and other possible problem spots, you can methodically go over the whole bike. If you see a dirty part of your bike when you are almost done checking for problems, then this is a part that still needs to be checked. And when you are done checking over your bike, it is clean and ready to ride.


Questions or Comments Welcome


Best Bargains

Giant Escape 3
Giant Escape 3
$379
Hollywood Express Trunk Rack
$74.99
Giant Control Tower 4 Floor Pump
$17.49
Planet Bike Clip-On Fender
$19.99
 
Shop Brands We Love